SST Updates guidelines
The New SST 2018 will be replacing GST on 1st September 2018.
TreezSoft cloud accounting strives to give you the best accounting experience, we've rolled up updates on SST, FREE for our clients!
We will be updating the tax codes, Charts of Accounts, tax preferences, and many more automatically for our current clients so that all your accounts will be always up to date.
While most of the updates will be done by us automatically, you will need to follow a few simple steps to verify the changes and to update your own tax preferences.
We will guide you on those simple steps:
- GST cease date
- Enable SST
- Verify COA and tax codes
- Configure Tariff Code of goods and services
- Update stock tax code
- Start your business operation as normal
- Generate SST return (SST-02)
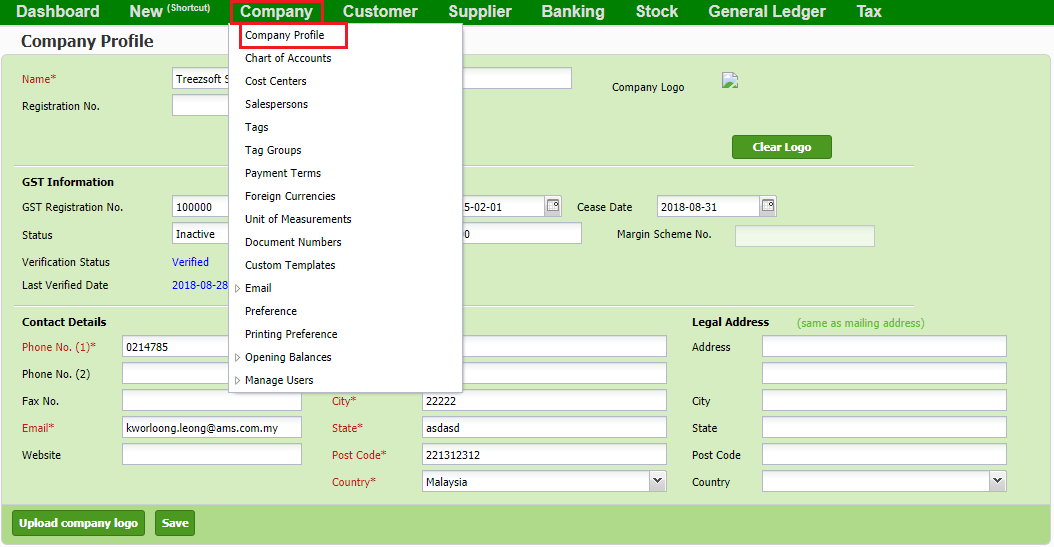
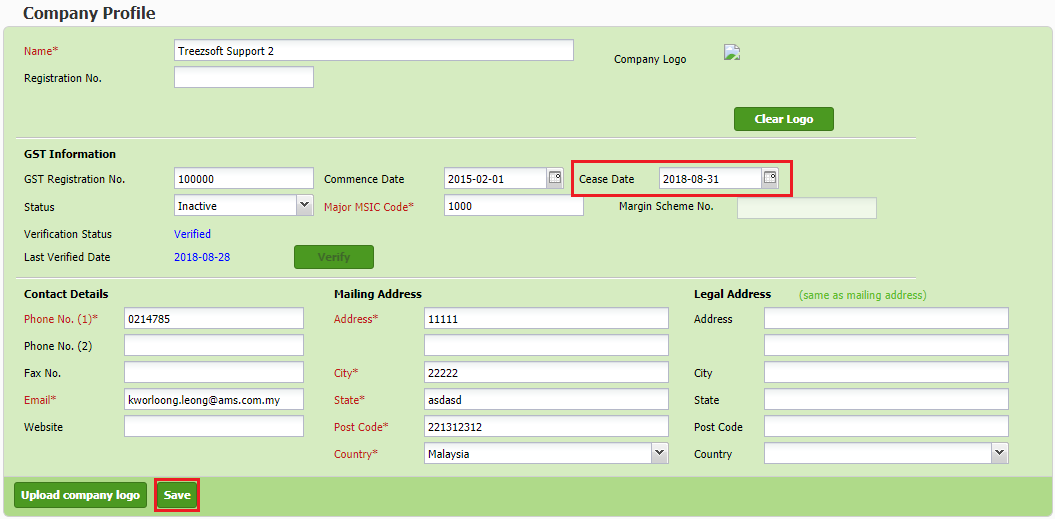
1) GST cease date
As SST will be replacing GST on 1st September, check that your GST registration cease date is automatically updated to be 31st August 2018.
To verify the cease date, navigate through: Company > Company Profile.
The cease date will be automatically updated to 31st August 2018 by our system.
2) Enable SST
After ceasing your GST registration, you will need to enable SST if you are SST registered. To enable SST mode, navigate through: Tax > SST > SST Preference.

Then, fill in all information accordingly as shown above.
Click on verify to verify your SST information, then save it. You will then have to re-login for the changes to take effect.
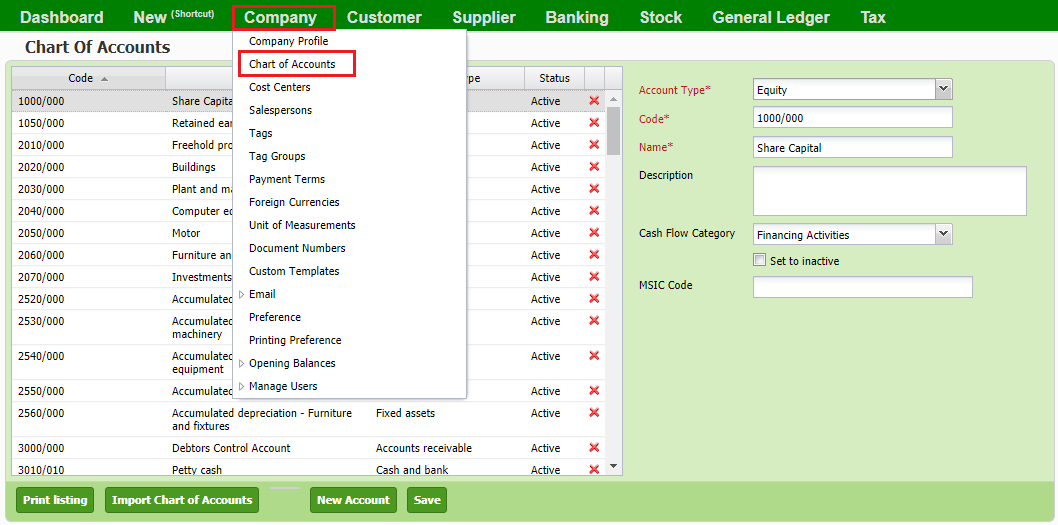
3) Verify COA and tax codes
As we have automatically update your charts of accounts, please check back to make sure you are informed about the updates incurred.
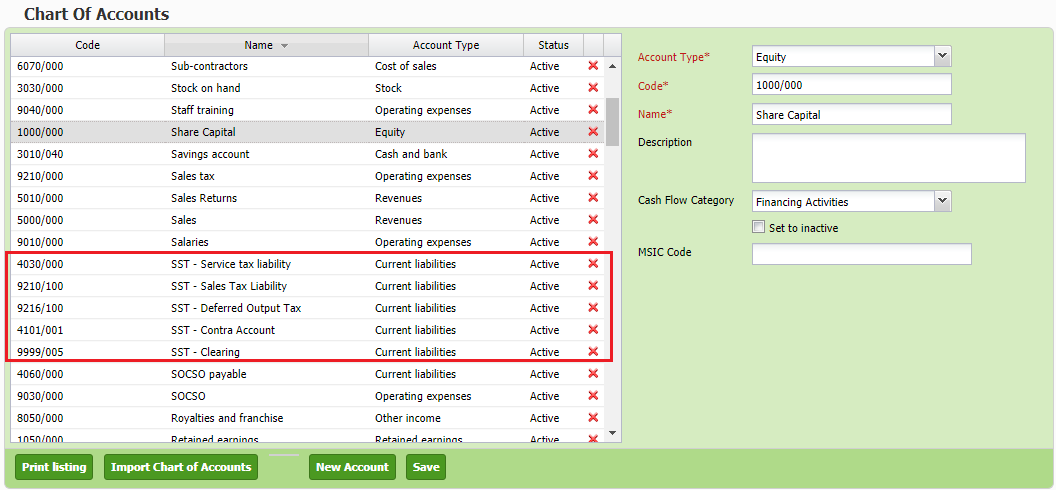
There will be 5 new SST related account added to your COA. To verify this update, navigate through: Company > Charts of Account.
From the screenshot below, note that there will be 5 new accounts added to your COA automatically.
After verifying your COA list, you can check you tax setup too. Simply navigate through: Tax > Tax setup.
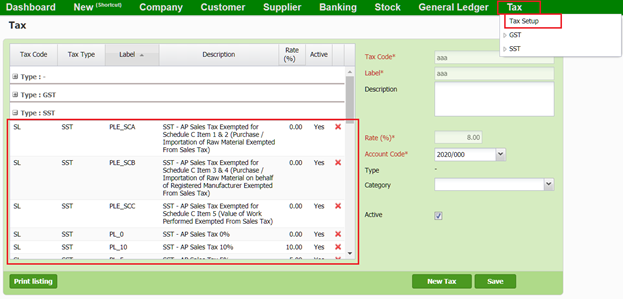
Note that there will be 4 new tax codes added in the list as shown above.
4) Configure Tariff Code of goods and services
After setting up and reviewing your SST preferences and tax codes. You will now need to setup the Tariff Code section.
Tariff Code mapping is used to determine the tariff code of goods/service, which can be mapped using Stock Item or Accounts. For example, if a sales invoice is entered by Stock Item, Item's tariff code will be used. While if sales invoice is entered by Accounts, Account's tariff code will be used.
You can find your item’s tariff code in the SST registration form that you submit to the custom department or visit this link: http://mysstext.customs.gov.my/tariff/
After tariff code mapping is done, system will calculate and group the taxable amount in SST-02.
To setup your Tariff Codes, navigate through: Tax > SST > Tariff Code.
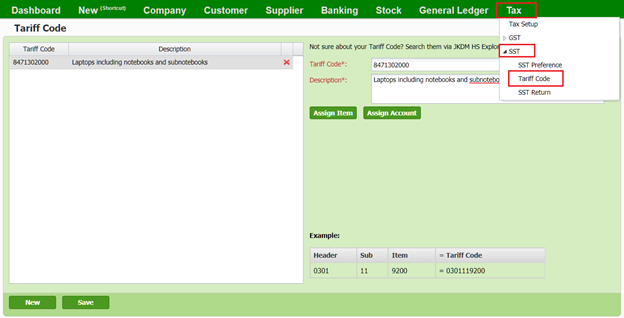
Then, click on New to create a new Tariff Code. Enter all the details in their respective columns. Assign items and account that you would like to map the Tariff code to.
*Please do not skip this step, as it is crucial to make sure your item and account are mapped to their respective tariff codes.*
A pop-up screen will appear when you click on Assign Item (as shown in screenshot below).
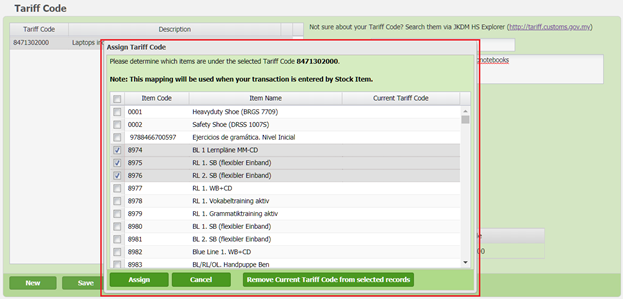
Select the item that you would like to map to the tariff code and click save.
Similarly, you will see a pop-up screen as below when Assign Account button is clicked.
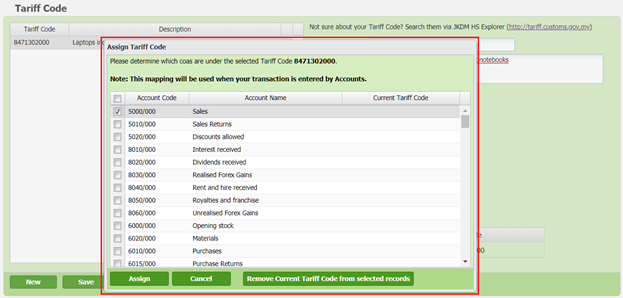
Select the account that you would like to map to the tariff code and click save.
The account should be an account that is used to represent the sales of goods and services.
5) Update stock tax code
After that, you just need to update each of your stock item's tax code. You can easily update all by batch by navigating through: Stock > Manage > Stock Item > Batch Update.
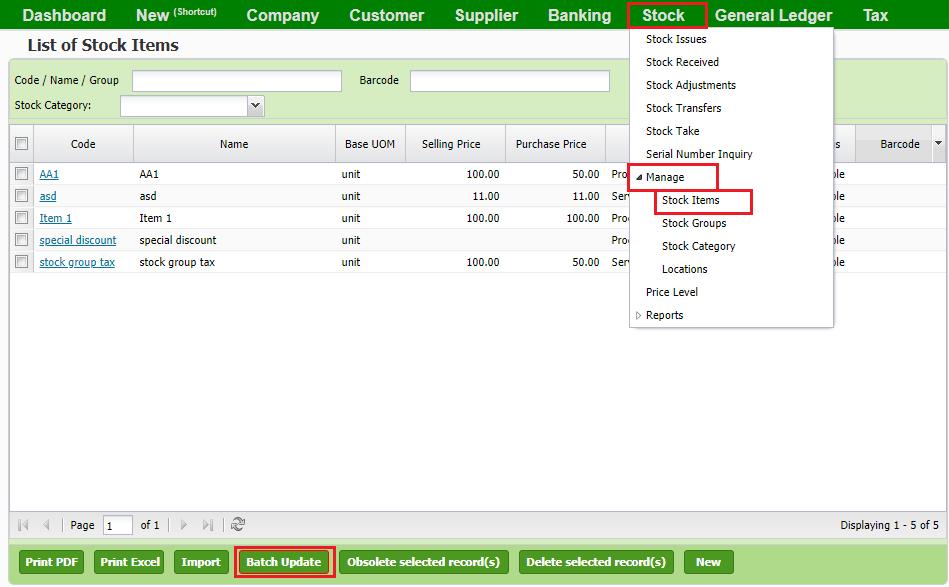
You can choose the tax code for the respective stock item by clicking on the respective tax column. Click save to confirm all changes made. You can also update your selling and purchase prices for each stock item if there is any changes.

Remember to set your purchase tax to “none” as you wouldn’t need to keep track of purchase tax (input tax) under the SST system.
6) Start your business operation as normal
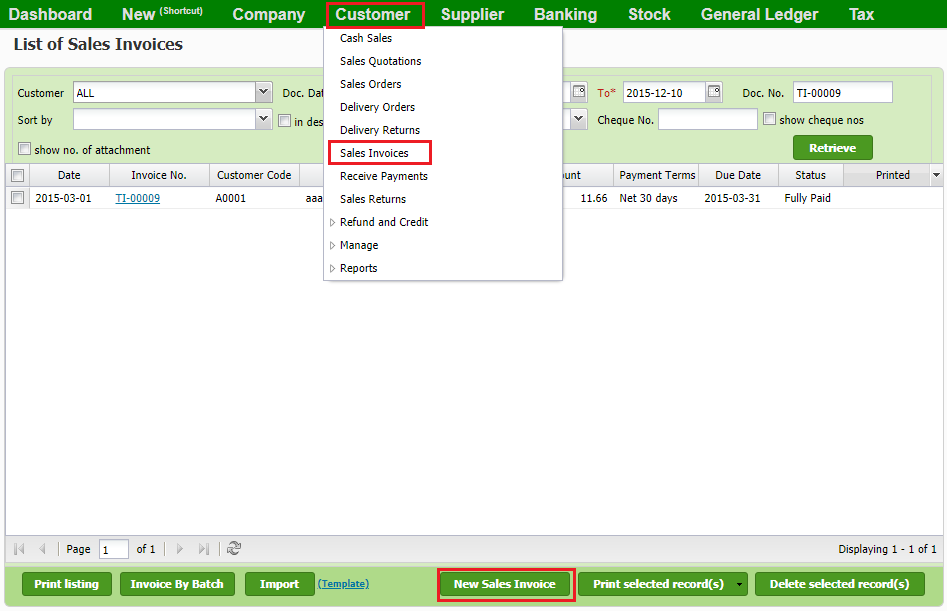
You're ready to start your business operation with TreezSoft now. You can check these changes when issuing a sales invoice that's DATED after or on 1st September 2018. Your printout will be automatically updated according to your SST setup as well.
To issue a sales invoice, navigate through: Customer > Sales invoice > New invoice.
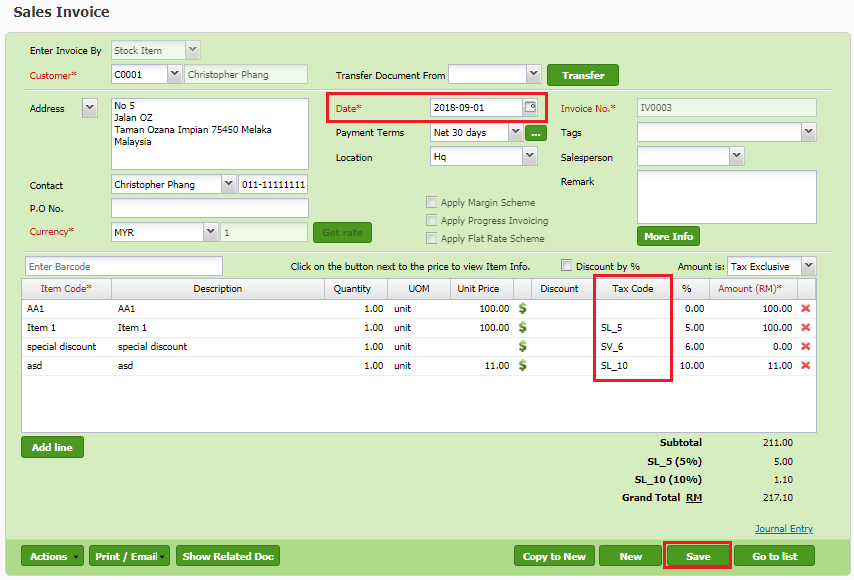
You can also view the accounts that each item has registered by clicking on the Journal Entry hyperlink.
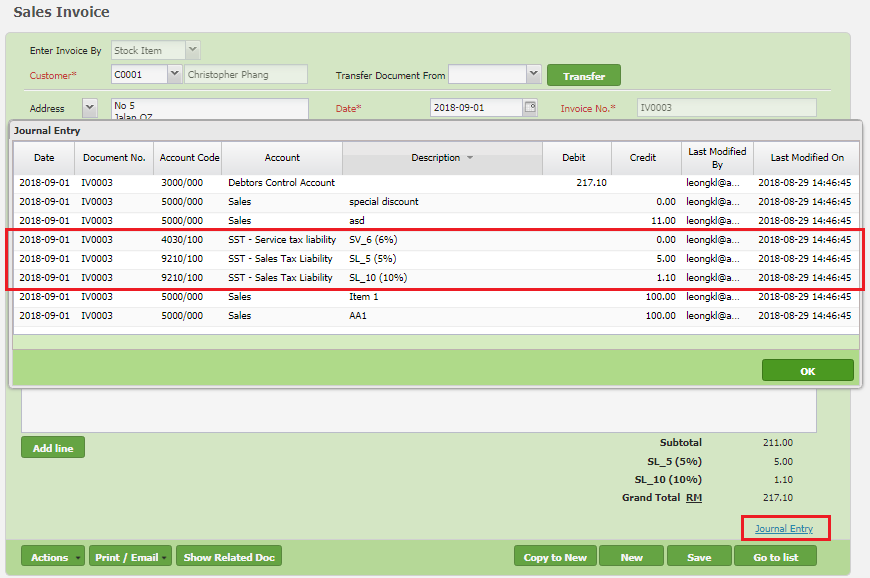
A gentle reminder: Please make sure all updates are reflected in your invoices before starting your daily business operation. You can save and print your invoice to verity these updates as well. You can refer to the screenshot on the next page.
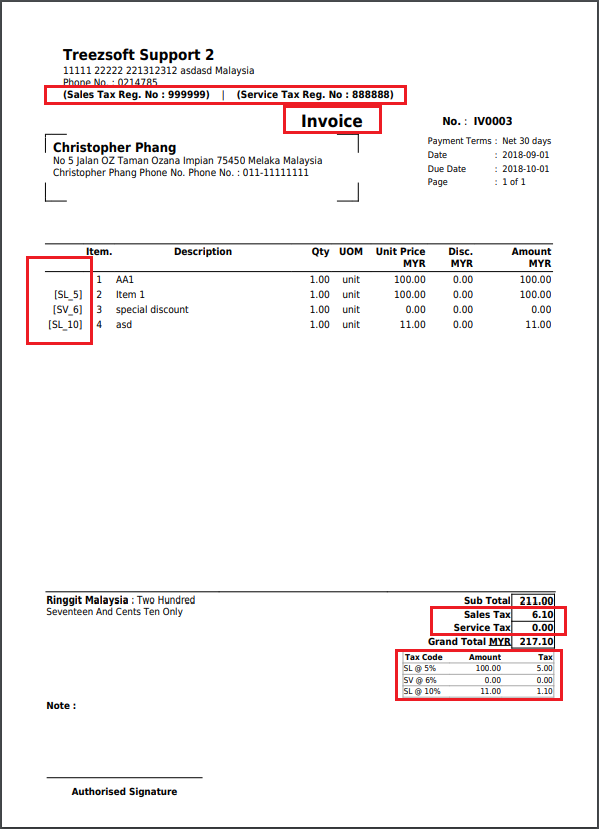
You can check that your SST information and tax codes are shown accordingly. Please also note that the title is “Invoice” instead of tax invoice used during GST period.
We will continue roll out more changes regarding SST such as SST return, bad debt and etc, when there is more updates from the custom.
If you are still considering to join TreezSoft, we urge you to join now and wait no more! Enjoy these free updates and smooth transition throughout your accounting journey with us.
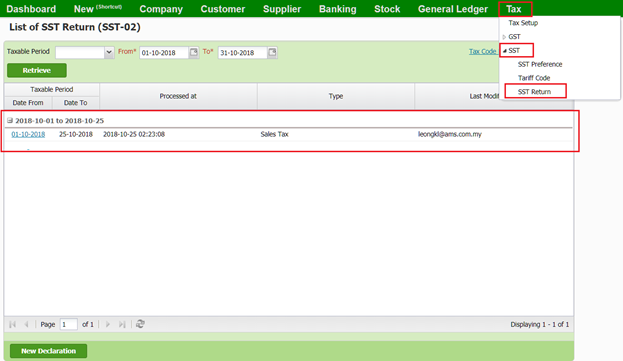
7) Generate SST Return (SST-02)
SST Return (SST-02) for Sales Tax and Service Tax need to be generated separately, if you are registered for both taxes.
Please note that for Service Tax return, only paid invoices or debit notes will be picked up, as it is “Cash Basis” according to the custom’s guideline.
To declare SST return, navigate through: Tax > SST > SST Return.
Click on New Declaration when you want to declare a new SST Return, or click on the hyperlink to enter view declaration detail.
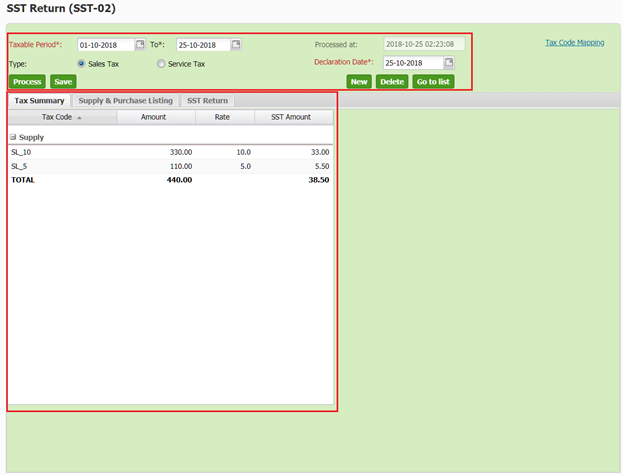
7.1 Tax Summary
It displays the Supply and Purchase amount that occurred during the taxable period, group by SST tax code.
On the screen below, select the taxable period you wanted and click on Process to generate your SST return report.
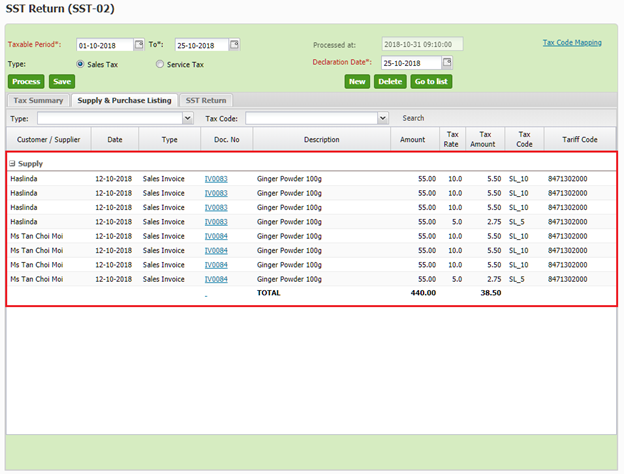
7.2 Supply and Purchase Listing
It displays the details of all Supply and Purchase transactions that occurred during the taxable period. This allows you to do cross check easily.
You can click into each hyperlink to be directed to the document listed.
7.3 SST Return
It is a screen mimicking SST-02 form. All amounts will be automatically calculated for you and will be filled in to their respective column.
You can then easily copy and paste these figures when filling in your SST-02 form in the MySST website.
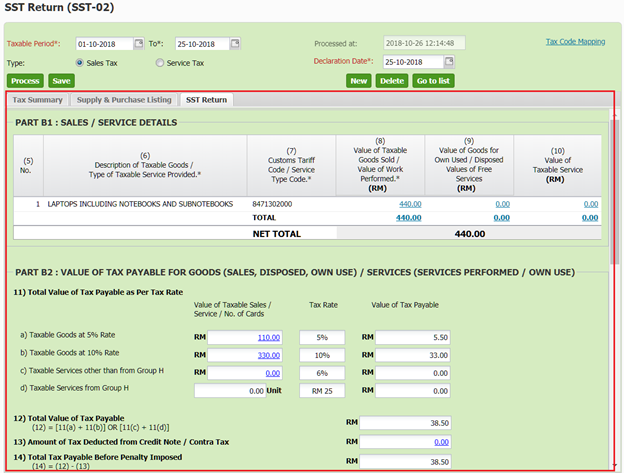
If you found some mistakes in your transactions, you may first update the transaction and then reprocess the SST Return.
You can easily be directed to list of transactions by clicking the respective figure.
Lastly, remember to save your SST Return.
You can also visit the links below to read more on SST related topics in TreezSoft:
TreezSoft is a cloud accounting software for Small and Medium-sized Enterprises (SMEs). It allows you to access your financial information anytime, anywhere. It also allows you to have unlimited users for FREE for your account in TreezSoft. Our aim is to help reduce our clients' time spent on accounting mainly by using our automated processes and integration to help increase their company effeciency at a minimum costs. SMEs can use TreezSoft to keep track their expenses, accounts, daily operation e.g. Point of Sales (namely QPOS) system and etc.
Visit TreezSoft at http://www.treezsoft.com/ to sign up for a 30 days trial account with us!
You can also email us at [email protected] for more enquiries.