Mengurus invois dengan cekap adalah kunci untuk kekal teratur dan patuh dalam dunia perniagaan yang pantas pada hari ini. Treezsoft menjadikan pengurusan e-Invois mudah dan lurus ke hadapan, membantu membentuk perniagaan , mengemas kini, membatalkan, dan menjejak e-Invois dengan mudah. Panduan ini akan membimbing anda melalui langkah-langkah penting untuk mengendalikan e-Invois dalam Treezsoft, sama ada anda mengeluarkan invois standard, invois yang dibil sendiri, atau mengendalikan kemas kini dan pembatalan. Kami juga akan membincangkan cara mengakses rekod e-Invois dan memastikan konfigurasi anda sentiasa terkini. Dengan amalan terbaik ini, anda akan dapat mengurus e-Invois anda dengan yakin dan memastikan semuanya berjalan lancar.
Aliran proses asas untuk
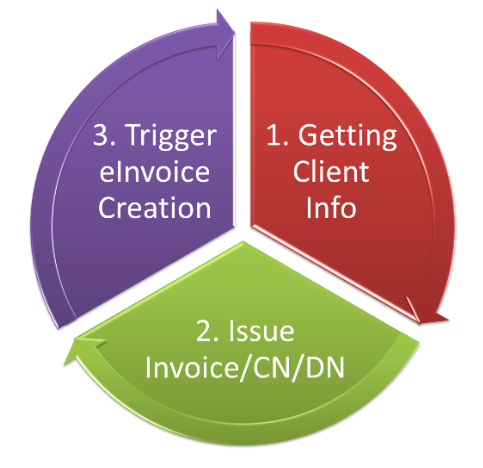
1. Aliran Penciptaan E-Invois
Langkah 1: Mendapatkan Maklumat Pelanggan.
Langkah 2: Keluarkan Invois/ Nota Kredit/ Nota Debit.
Langkah 3: Mengaktifkan Perciptaan e-Invois.
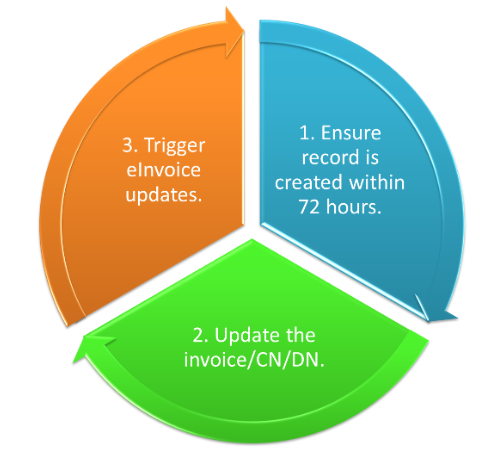
2. Aliran Kemas Kini e-Invois
Langkah 1 : Pastikan Rekod Dicipta dalam masa 72 jam.
Langkah 2: Kemas kini Invois/ Nota Kredit/ Nota Debit.
Langkah 3: Tekan Kemas Kini e-Invois.
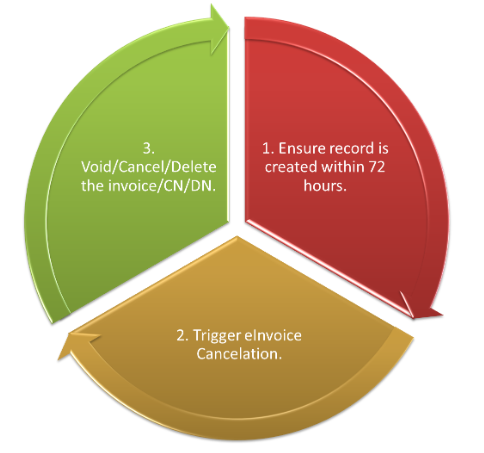
3. Aliran Pembatalan e-Invois
Langkah 1: Pastikan Rekod Dicipta dalam masa 72 jam.
Langkah 2: Tekan Pembatalan e-Invois.
Langkah 3: Batal/ Hapus Nota Invois/ Nota Kredit/ Nota Debit.
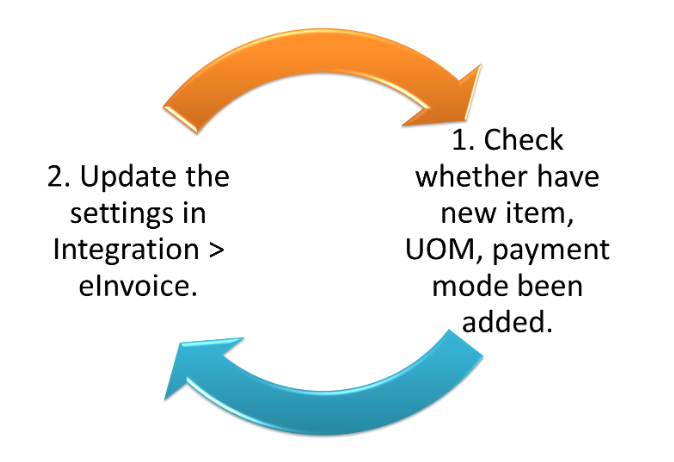
4. Kemas kini Tetapan e-Invois
Langkah 1: Semak sama ada item baru, UOM, dan mod pembayaran telah ditambah.
Langkah 2: Kemas kini tetapan dalam Integrasi > e-Invois.
Langkah-langkah untuk Mengeluarkan Invois Standard
1. Hasilkan invois seperti biasa, pastikan semua butiran yang diperlukan disertakan.
2. Pastikan Nombor Pengenalan Pembayar Cukai (TIN) dan ID pelanggan telah disediakan dalam sistem.
3. Tekan pada butang E-Invois yang terletak di sudut kanan atas laman web.
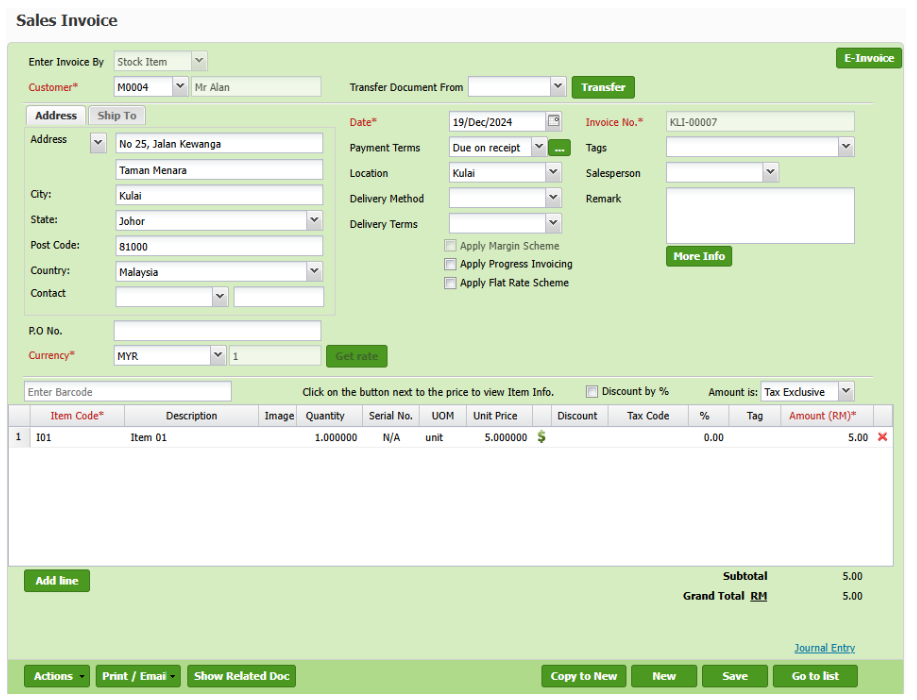
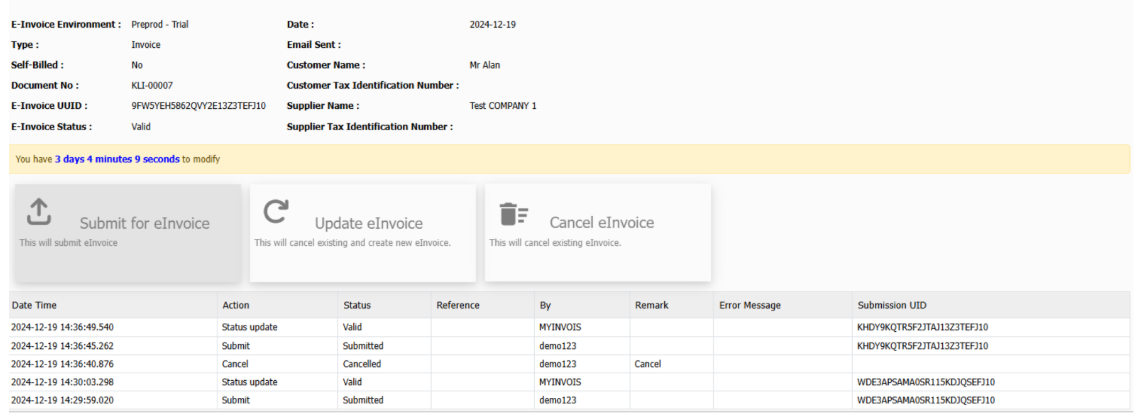
4. Pada halaman e-Invois, tekan Hantar untuk e-Invois bagi memulakan proses penjanaan e-Invois.
5. Semak status e-Invois untuk mengesahkan sama ada penghantaran berjaya. Jika ralat dikesan semasa proses pengesahan, tangani segera dengan mengemas kini maklumat yang diperlukan dalam invois.
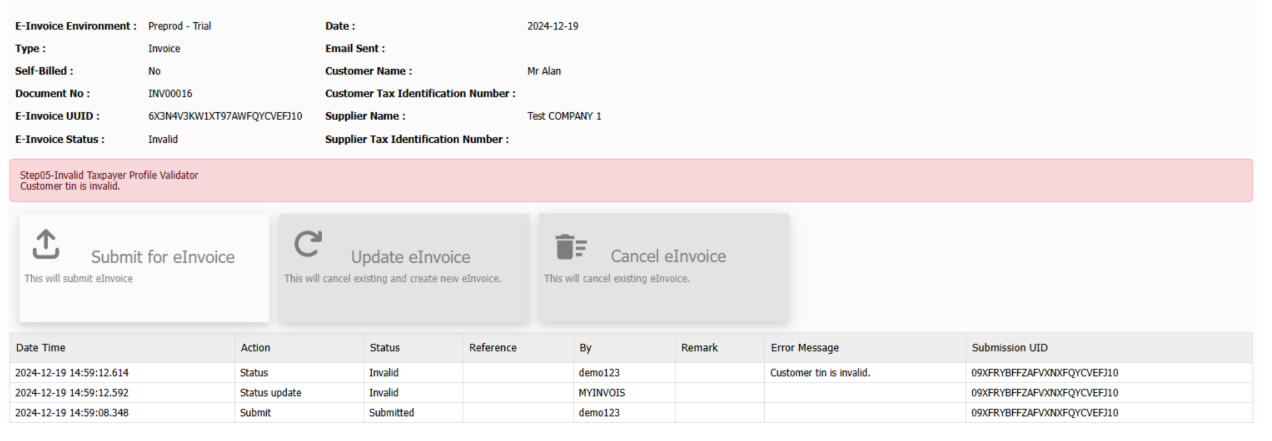
6. Selepas pembetulan, hantar semula e-Invois menggunakan pilihan Hantar untuk e-Invois yang sama.
7. Pastikan bahawa status berubah kepada Sah, menunjukkan e-Invois telah berjaya diproses.
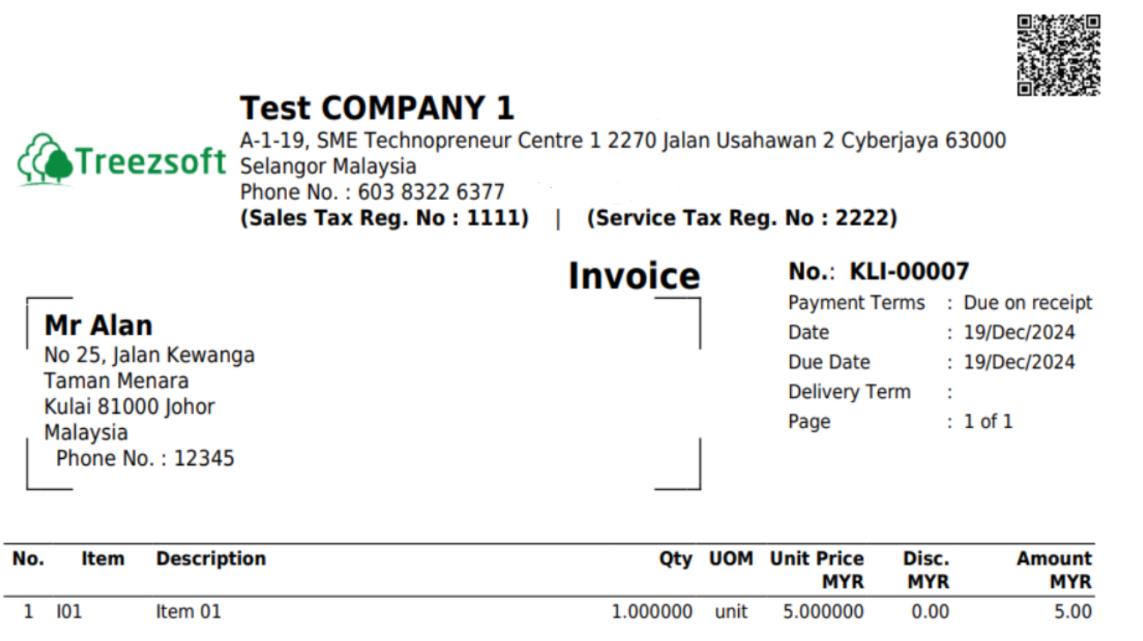
 8. Setelah e-Invois sah, cetak invois tersebut untuk rekod anda.
9. Kod QR akan disertakan, membolehkan pelanggan mengimbas dan mengesahkan e-Invois.
10. Kongsikan invois akhir dengan pelanggan.
Bagaimana jika ada sebarang perubahan dibuat dalam masa 72 jam?
1. Kemas kini dan simpan invois seperti biasa.
2. Klik pada butang E-Invois di sudut kanan atas dan sistem akan membawa anda ke halaman e-Invois.
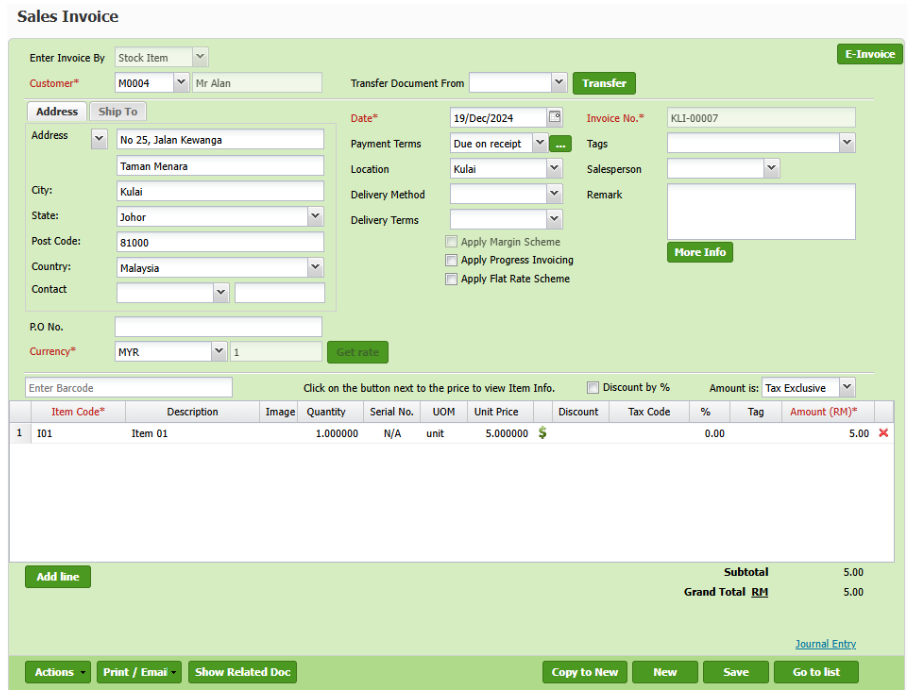
3. Pada halaman e-Invois, klik butang Kemas Kini e-Invois untuk memulakan proses kemas kini bagi e-Invois yang sedia ada.
4. Semak status e-Invois untuk memastikan kemas kini diproses dengan betul dan tangani sebarang kesilapan dengan membetulkan maklumat dan menghantar semula kemas kini jika perlu.
5. Setelah status berubah ke Sah, kongsikan e-Invois yang telah dikemas kini dengan pelanggan.
Nota: Mengemas kini e-Invois akan membatalkan e-Invois yang sedia ada secara automatik dan e-Invois yang baru akan dijana semula bagi mencerminkan perubahan.
Ikuti langkah-langkap yang sama untuk mengaktifkan e-Invois standard untuk:
- Jualan Tunai
- Pulangan Jualan, Nota Kredit
- Nota Debit
Langkah-langkah untuk mengeluarkan e-Invois Pengebilan Sendiri
1. Sediakan invois pembekal seperti biasa, pastikan semua butiran yang diperlukan adalah tepat.
2. Sahkan bahawa Nombor Pengenalan Pembayar Cukai (TIN) dan ID pembekal telah disediakan dengan betul dalam sistem.
3. Tandakan kotak e-Invois Pengebilan Sendiri dalam borang invois.
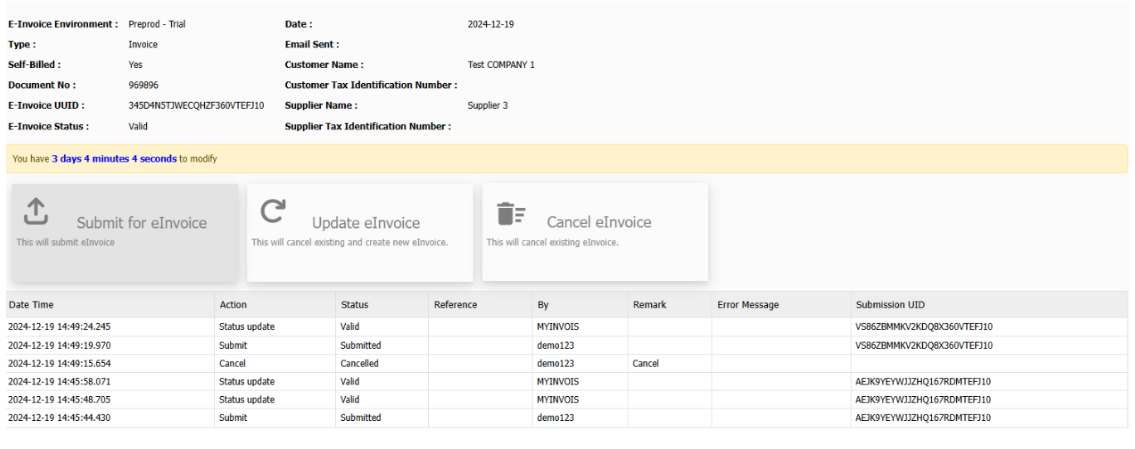
4. Klik pada butang E-Invois yang terletak di sudut kanan atas skrin. Sistem akan secara automatik mengalihkan anda ke halaman penghantaran e-Invois.
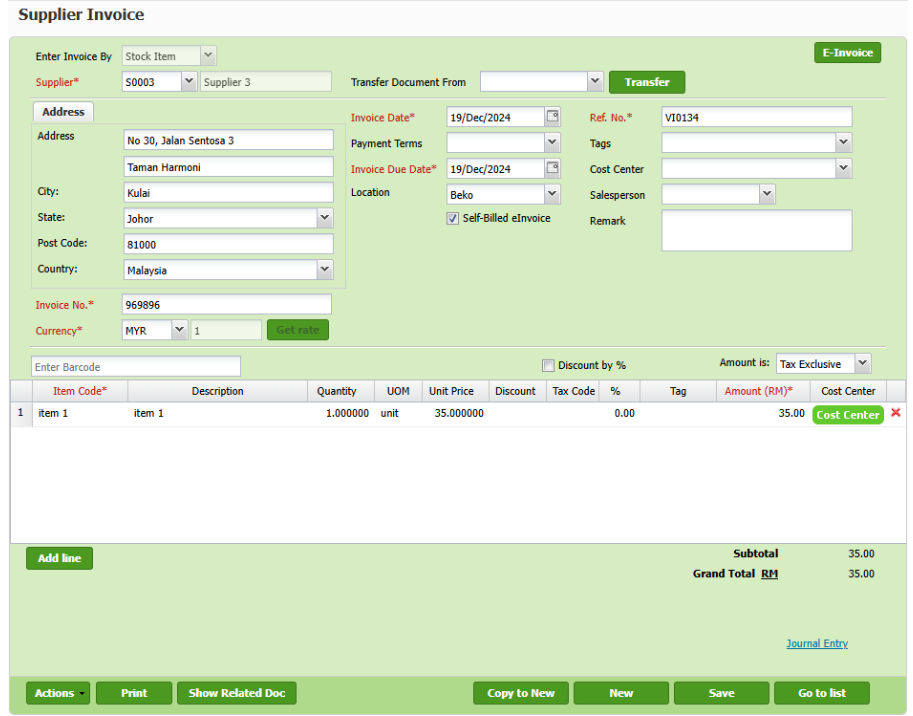
5. Pada halamaan e-Invois, klik butang Hantar untuk e-Invois untuk memulakan proses penjanaan dan penghantaran e-Invois.
6. Semak status e-Invois untuk mengesahkan sama ada penyerahan berjaya. Jika terdapat kesilapan semasa proses pengesahan, tangani dengan segera dengan mengemas kini maklumat yang diperlukan dalam invois.
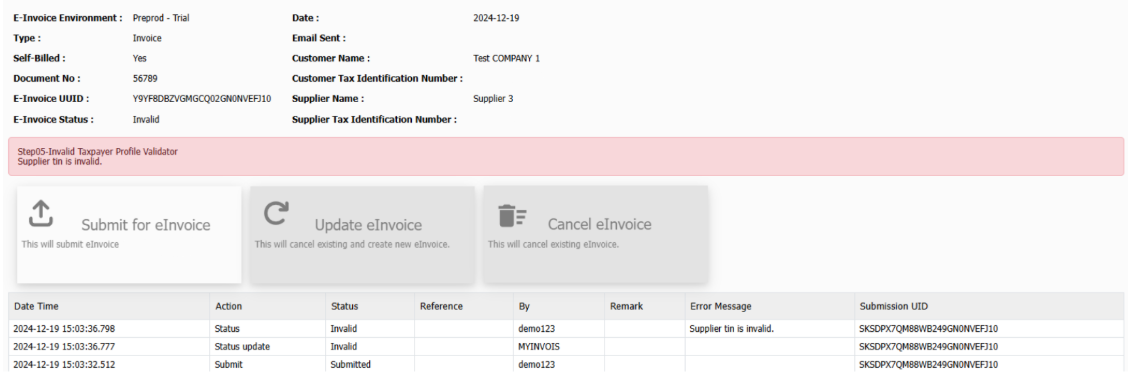
7. Selepas pembetulan, klik butang Hantar untuk e-Invois sekali lagi untuk menghantar semula eInvoice yang telah dikemas kini.
8. Jika tiada kesilapan lanjut ditemui, sistem akan memaparkan status Sah, menunjukkan e-Invois telah diproses dengan jayanya.

Bagaimana jika ada sebarang perubahan dibuat dalam masa 72 jam?
1. Kemas kini dan simpan invois seperti biasa.
2. Klik pada butang E-Invois di bahagian kanan atas dan sistem akan mengalihkan anda ke halaman eInvois.
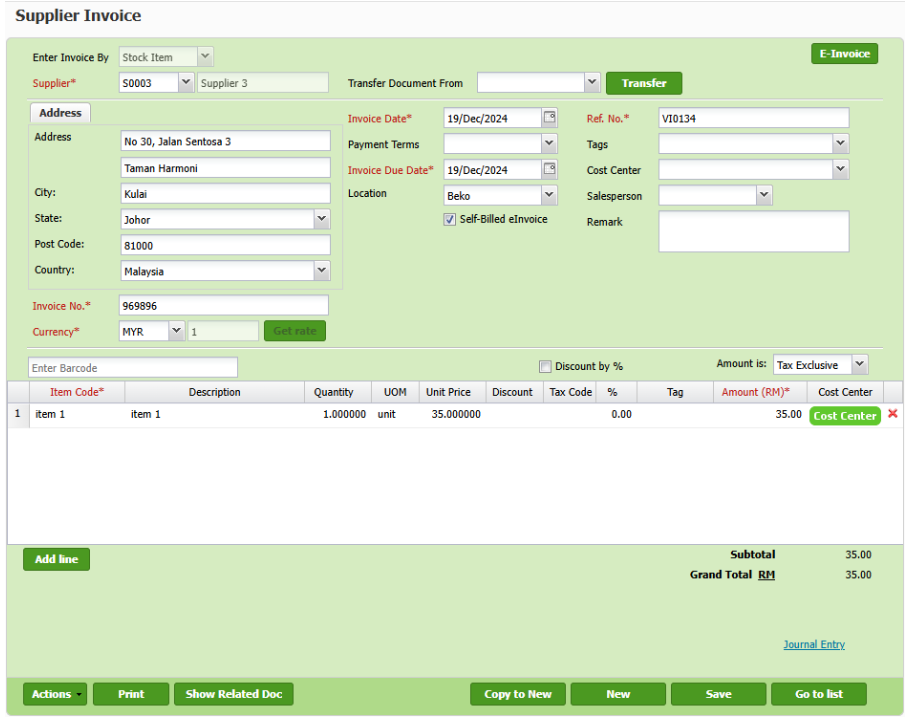
3. Klik butang Kemas Kini e-Invois untuk memulakan proses kemas kini bagi e-Invois yang sedia ada.
4. Semak status e-Invois untuk mengesahkan sama ada kemas kini telah diproses dengan berjaya. Jika kesilapan pengesahan dikesan, buat pembetulan yang diperlukan pada butiran invois.
Nota: Mengemas kini e-Invois akan secara automatik membatalkan e-Invois yang sedia ada dan menghasilkan yang baru untuk mencerminkan perubahan.
Anda boleh rujuk langkah-langkah yang sama untuk menghasilkan e-Invois Pengebilan sendiri untuk
- Pembelian Tunai
- Pulangan Pembelian
- Nota Kredit Pembekal / Nota Debit Pembekal
Pertanyaan Rekod e-Invois
Semak semua e-Invois yang telah dihantar bersama status masing-masing dengan mudah.
1. Di bawah menu “Cukai > E-invois > Pertanyaan E-invois” untuk mengakses halaman pertanyaan e-Invois.
2. Gunakan tapisan yang tersedia untuk mengecilkan hasil carian mengikut kriteria tertentu, seperti julat tarikh, butiran pelanggan, atau status. Semak senarai e-Invois yang telah ditapis untuk melihat butiran yang komprehensif.

Kemas kini Konfigurasi e-Invoice
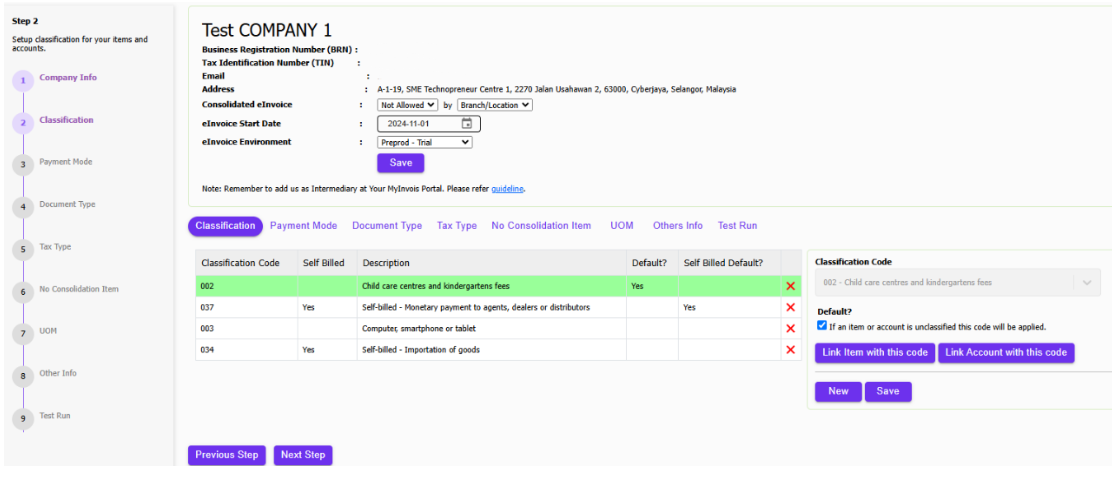
1. Setiap kali item baru, mod pembayaran, atau unit ukuran (UOM) ditambahkan ke dalam sistem, pastikan konfigurasi e-Invois dikemas kini untuk diselaraskan dengan perubahan ini bagi integrasi yang lancar.
Peraliahan ke Perakaunan Awan Treezsoft
Sambut perubahan digital dengan Perakaunan Awan TreezSoft, penyelesaian tanpa halangan untuk keserasian E-Invoicing LHDN. Dengan kedatangan era percukaian digital, Perakaunan Awan TreezSoft bersedia untuk membimbing perniagaan melalui peralihan E-Invoicing, menyediakan penyelesaian perisian yang kukuh dan mesra pengguna. Mulai 1 Ogos 2023, pembeli penyelesaian TreezSoft akan mendapat akses percuma kepada modul E-Invois sehingga 2028, menekankan komitmen kami terhadap pematuhan cukai yang berpatutan dan cekap.
Sertai Masa Depan Perakaunan Hari Ini
Jangan biarkan perniagaan anda ketinggalan. Sambut masa depan perakaunan dengan TreezSoft. Daftar hari ini dan jadi antara yang pertama merasai kecekapan dan kemudahan e-invois kami. Dengan Perakaunan Awan TreezSoft, anda bukan sekadar mengikuti perkembangan zaman; anda yang menetapkan rentak.
TreezSoft adalah perisian perakaunan awan untuk Perusahaan Kecil dan Sederhana (PKS). Anda boleh mengakses maklumat kewangan anda pada bila-bila masa, di mana sahaja dan kami menggunakan proses automatik dan integrasi untuk mempromosikan kecekapan dalam proses perakaunan anda dan pengurusan kesihatan kewangan. Anda juga boleh mencipta bilangan pengguna yang tiada had secara PERCUMA untuk akaun anda di TreezSoft.
Lawati TreezSoft di http://www.treezsoft.com/ untuk mendaftar akaun percubaan selama 30 hari bersama kami!
Ikuti Halaman Facebook kami untuk lebih banyak maklumat terkini:https://www.facebook.com/TreezSoft
Anda juga boleh menghantar emel kepada kami di [email protected] untuk pertanyaan lanjut.